Saturday, September 17, 2011

Recycled Bows

The kids are going to a birthday party later today.  I remembered some tutorials I saw awhile ago for making holiday bows from magazine pages.  I decided that I would make a bow for the birthday present.   I basically followed this tutorial here at New Green Mama.  I made this bow from a red plastic bag. I must say that plastic might not be the best material for bow-making since it is not very stiff.  Still, I thought it turned out okay.

P1100552
P1100553

I didn’t have any magazines on hand but I did happen to have a complimentary copy of Jakarta Expat which is a newspaper but printed on glossy paper like a magazine.  Here are a few bows I made from the newspaper.

P1100555

Making the bows is a lot of fun!  If you have some old magazines lying around, you might try making some fun bows. There are lots of examples on the internet of some beautiful bows made from magazine pages.

Wednesday, September 14, 2011

Plastic Bottle Light Source

A friend of mine posted this video on Facebook.  I thought it was a fantastic resuse for plastic soda bottles.  Necessity is the mother of invention!


I was reading more about these soda bottle lights.  Apparently each one is equivalent to a 55 or 60W light bulb.  They are also good for up to five years!

Tuesday, September 6, 2011

Castle

My oldest loves playing battle with his Lego “dudes” and army men.  He also likes knights and castles so he asked if we could make a castle.  Mommy found a fun website to make a castle from cereal boxes, toilet paper rolls, and paper.  We printed the parts of the castle on scrap paper, the kids colored them, and then we pasted the paper onto the cereal boxes and cut out the pieces.  I did most of the assembling since it was difficult for the kids to fold the cardboard and to glue the parts in place. Here is the link to the website to make the castle.


The finished castle.
DSC_0003DSC_0030


Ready to do battle. 
DSC_0005DSC_0006


My son decided he needed another castle for the “enemy” troops so we made one out of a juice box container. He also remembered his other box creations and got them out too to use in the battle.


DSC_0024DSC_0025DSC_0026DSC_0027DSC_0028DSC_0029DSC_0031DSC_0032DSC_0041DSC_0042DSC_0043DSC_0044DSC_0004


I think DH is planning on getting my son a Lego Castle for Christmas, but in the meantime, he certainly is having plenty of fun with his cardboard box creations.

Friday, September 2, 2011

Chocolate Strawberry Dessert

I bought some strawberries the other day, but the kids seem to have decided that they don’t like the local strawberries.  I think they are not as sweet as the ones they were used to back in the U.S.  Maybe I just don’t know where to get good strawberries, but all the ones I have bought so far do seem to be on the tart side.
So, since I had a couple of containers of strawberries, and no one wanted to eat them, I decided to make a dessert.  I looked at several different recipes on the internet and found one that was delicious!  We all liked it a lot.  Unfortunately I can’t find the website where I originally found the recipe. 
Here is the recipe I jotted down:
6 oz semi-sweet chocolate chips ( I just used the local brand of chocolate chips I found at Lotte Mart here in Jakarta…I don’t even know what kind of chocolate chips they are)
2 Tbsp. butter
1/2 cup powdered sugar
3 Tbsp. water
1 8 oz. package cream cheese (I used the Yummy brand that comes in a little tub…it’s roughly the equivalent of a block of cream cheese)
2 pt. strawberries
3 Tbs. strawberry jelly + 2 Tsp water
Place all the ingredients except for the strawberries and the jelly in a pan and stir over medium to low heat until everything is melted.  The filling should be nice and creamy.  Pour into a cooled pie crust.   Wash and remove the strawberry stems.  Put the strawberries on top of the filling and drizzle with strawberry jelly mixture.  Chill the dessert for 2 hours until the filling has set.
I used a ready made chocolate pie crust that a friend had given me awhile back.  I think this dessert would go really well in an Oreo cookie  pie crust.
Oreo Crust
Roughly 20 Oreo cookies with the cream removed
3 Tbsp melted butter
Crush the cookies inside a plastic bag with a rolling pin or hammer.  It’s easier to smash them in small batches.  Mix with melted butter.  Press into pie plate or pan and bake at 350F for 15 minutes. 
P1100459
I actually didn’t have any strawberry jelly…just jam which is why the the filling looks a little lumpy between the strawberries.  It still tasted good.  The kids devoured it…strawberries and all!

Wednesday, August 31, 2011

Blueberry Cream Muffins

The kids love blueberry muffins so I've been on the hunt for a good muffin recipe.  I've tried a couple already, but they weren't all that good.  I came across this recipe for Ann's Awesome Blueberry Muffins and everyone loved it.  I halved the recipe and made 12 large muffins instead of 24.

Here is the recipe halved.

Ann’s Awesome Blueberry Muffins


2 eggs

1 cup white sugar

1/2 cup vegetable oil

1/2 tsp. vanilla extract

2 cups all-purpose flour

1/2 tsp. salt

1/2 tsp. baking soda

1 cup sour cream

1 cup blueberries


1) Preheat oven to 400 degrees F (200C). Grease 12 muffin cups or line with paper muffin liners.

2) In a large bowl, beat eggs. Gradually add sugar while beating. Continue beating while slowly pouring in oil. Stir in vanilla. In separate bowl, stir together flour, salt and baking soda.

3) Stir dry ingredients into egg mixture alternately with sour cream. Gently fold in blueberries. Scoop batter into prepared muffin cups.

4) Bake in preheated oven for 20 minutes.

Makes 12 muffins.


I rolled the blueberries in flour and a little bit of sugar to keep the blueberries from staining the batter purple.  The kids loved the muffins except for the blueberries.  They thought they were too tart.  DH and I liked this recipe alot.  I think next time though, I may try it using canned blueberries.  That way the blueberries will be sweet and not tart.  I think my kids would like them better.  I still think this recipe is a keeper!

Maybe a little bit overdone but they were still nice and moist.

Monday, August 29, 2011

General Tso’s Chicken

One of DH’s favorite dishes is General Tso’s chicken.  I found a recipe online awhile ago that we really like.  I have modified the recipe a little since I am trying to get away from using corn starch.  Corn starch is used a lot in Asian cooking to thicken sauces and to make fried foods like sweet and sour chicken or pork.  The recipe as written makes a really good General Tso’s chicken dish.  We thought it still tasted great using flour instead of corn starch. I have made it both ways.  Serve the dish with plain rice.  This dish is definitely one of our family favorites…enjoy!
Here is the original recipe:
Sauce:
1/2 cup cornstarch
1/4 cup water
1+1/2 tsp minced garlic
1+1/2 tsp minced ginger root
3/4 cup sugar
1/2 cup soy sauce
1/4 cup white vinegar
1/4 cup cooking wine ( I did not use cooking wine)
1+1/2 cup hot chicken broth
1 tsp monosodium glutamate (I never use msg)

Meat:
3 lbs deboned dark chicken meat, cut into large chunks
1/4 cup soy sauce
1 tsp white pepper
1 egg
1 cup cornstarch
Vegetable oil for deep-frying
2 cups sliced green onions
16 small dried hot peppers


1) Mix 1/2 cup cornstarch with water.  Add garlic, ginger, sugar, 1/2 cup soy
sauce, vinegar, wine, chicken broth and MSG (if desired).  Stir until sugar
dissolves.  Refrigerate until needed.

2) In separate bowl, mix chicken, 1/4 cup soy sauce and white pepper.  Stir in
egg.  Add 1 cup cornstarch and mix until chicken pieces are coated evenly. 
Add cup of vegetable oil to help separate chicken pieces.  Divide chicken into
small quantities and deep-fry at 350 degrees until crispy.  Drain on paper
towels.

3) Place a small amount of oil in wok and heat until wok is hot.  Add onions
and peppers and stir-fry briefly.  Stir sauce and add to wok.  Place chicken in
sauce and cook until sauce thickens.

The changes I made were:

For the sauce, I omitted the corn starch. Then after stir-frying the onions and peppers, I added 6 Tbs. all-purpose flour and stir-fried briefly.  Then I added the sauce and the fried chicken pieces and cooked the sauce for 10-15 minutes until the sauce thickened.

For the meat:  I added all the ingredients except for the cornstarch and the oil.  There is no need to add the oil since the pieces were not being coated in cornstarch. I mixed the chicken pieces until they were thoroughly coated.  Then I coated each chicken piece with all-purpose flour.  I deep-fried the chicken pieces until they were crispy.  Then I added the chicken to the sauce.
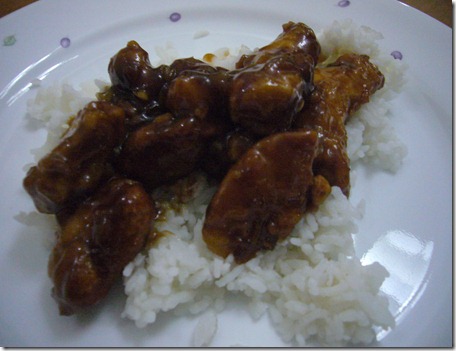
P1100463

Friday, August 12, 2011

Solar Power for Ford Focus EV

Photo from: green.autoblog.com

DH loves cars and is always ontop of new things that are going on in the car industry.  He just sent me an email about the Drive Green For Life Program.  The program is the result of a partnership between Ford and Sunpower Corp. (a solar energy provider).  It allows a Ford Focus Electric vehicle to be charged via solar panels on the roof of your house. This offsets the amount of electricity that is needed to charge the vehicles at night and therefore lowers the monthly operation cost of the vehicle.  Also, because the Ford Focus electric vehicles run entirely off of electricity stored in the car's battery, there are zero emissions.  The cost is roughly $10,000. 

Check out this article to learn more about the partnership between Ford and Sunpower Corp. for solar charging Ford Electric and Hybrid vehicles.


I think DH really secretly or maybe not so secretly wants to get one of the new Ford Focus electric vehicles.  I have to admit, they are pretty darn cool and of course, let's not forget, environmentally friendly as well :)