Monday, November 14, 2011
Gone Public
I made the new blog (http://www.5abroad.blogspot.com/) public today. I think I've sorted out all the travel and living in Indonesia-related posts. I hope that this change will be a positive one. If it doesn't help anyone else, I think it will help me be more organized and focused for future posts. Sorry for any confusion.

Friday, November 11, 2011
New Blog
I've decided that I want to have this blog focus on things related to living a more sustainable lifestyle. Therefore, I am moving any posts about traveling and living in Indonesia to a new blog: http://www.5abroad.blogspot.com/. It will probably take me a few days to move the blog posts to the new blog and to reorganize both blogs. I will make the new blog public soon. I want to make sure that I am not duplicating content in two separate blogs. I hope you will come visit me at the new blog and continue to read about our adventures living and traveling abroad.
Thursday, November 10, 2011
Another Turkey Craft
I was looking for another craft for the kids to work on and found some fun ideas on pinterest. I combined a few things that I saw and this is what I came up with:

My 3-year old let me trace her hand. Then I cut out the shape of her hand on different colored sheets of paper. I did both the right and left hands. My daughter put glue on the hands and I helped her attach them to a toilet paper roll. The face is also made of scraps of colored paper. I thought leaving the toilet paper roll open on top looked a little funny so I added a hat.

We put the finished turkey in our front entryway next to the toilet paper roll pumpkins that we made for Halloween. I just removed the jack-o-lantern faces from the pumpkins. This was a fun craft to make with my little one. I love looking at her little handprints and she loves her turkey!

My 3-year old let me trace her hand. Then I cut out the shape of her hand on different colored sheets of paper. I did both the right and left hands. My daughter put glue on the hands and I helped her attach them to a toilet paper roll. The face is also made of scraps of colored paper. I thought leaving the toilet paper roll open on top looked a little funny so I added a hat.

We put the finished turkey in our front entryway next to the toilet paper roll pumpkins that we made for Halloween. I just removed the jack-o-lantern faces from the pumpkins. This was a fun craft to make with my little one. I love looking at her little handprints and she loves her turkey!
Wednesday, November 9, 2011
Thanksgiving Turkey Craft
So we were a little late in getting started on Halloween crafts so I thought we would get an earlier start on Thanksgiving. Sunday evening the kids made turkeys from a paper plate and scraps of colored paper. They decorated the turkeys with markers and crayons. I had the kids tell me what they were thankful for and we wrote them on the feathers. The older 2 kids wanted to do their own writing. It was so sweet to read the things they were thankful for: friends, family, church, the earth, toys, bed, clothes, food, home, car, etc. We had lots of fun making these turkey decorations.


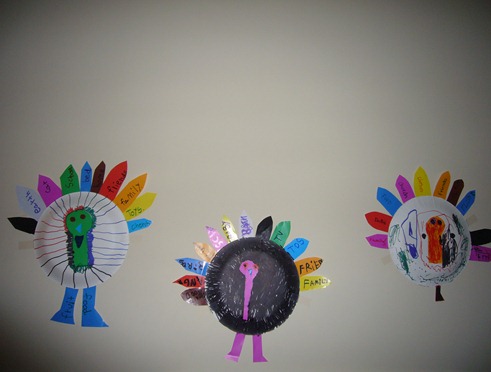
Our new wall decorations! Looks like one of the turkeys is missing a foot…lol.


Our new wall decorations! Looks like one of the turkeys is missing a foot…lol.
Wednesday, November 2, 2011
Fun Halloween
The kids had so much fun this Halloween. I would never have guessed that the kids would be able to celebrate Halloween in Jakarta. The locals seemed to know about Halloween. There were costumes and Halloween decorations available at the stores. Even our apartment complex put on a Halloween party for the kids and organized trick-or-treating. We had a great time celebrating Halloween in Jakarta!
In a previous post, my daughter and I decorated a Pringles can to look like Frankenstein. She decided she wanted a whole Frankenstein family so we made a “Mommy Frankenstein” from another Pringles can and a “Baby Frankenstein” from a toilet paper roll.

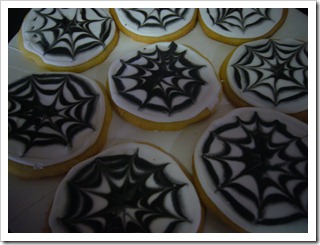
I made some spider cookies for a bake sale at school. It’s sugar cookies coated with white royal icing and swirled rings of black icing.
I also baked some owl cupcakes for a Halloween party. I got the idea by doing a search for Halloween cupcakes online. There are lots of cool images for owl cupcakes. The eyes are made from Oreo cookies and the pupils and nose are M&M’s.

Here are my three munchkins dressed up for Halloween. My son wore camouflage and we bought a plastic gun. We already had the helmet. My daughter wore her ballerina outfit. My youngest daughter wore a dress made from one of my old prom dresses, and we made a crown from tin foil and cardboard.

We had a fun-filled Halloween. We hope you did too!
In a previous post, my daughter and I decorated a Pringles can to look like Frankenstein. She decided she wanted a whole Frankenstein family so we made a “Mommy Frankenstein” from another Pringles can and a “Baby Frankenstein” from a toilet paper roll.

I made some spider cookies for a bake sale at school. It’s sugar cookies coated with white royal icing and swirled rings of black icing.

I also baked some owl cupcakes for a Halloween party. I got the idea by doing a search for Halloween cupcakes online. There are lots of cool images for owl cupcakes. The eyes are made from Oreo cookies and the pupils and nose are M&M’s.

Here are my three munchkins dressed up for Halloween. My son wore camouflage and we bought a plastic gun. We already had the helmet. My daughter wore her ballerina outfit. My youngest daughter wore a dress made from one of my old prom dresses, and we made a crown from tin foil and cardboard.

We had a fun-filled Halloween. We hope you did too!
Thursday, October 27, 2011
Festive Halloween Candy
I found a fun tutorial here while looking for Halloween treat ideas to make for my son’s class. I didn’t have any chocolate candy bars, but I did find individual packets of skittles. I attached google eyes to a piece of black paper and adhered them to the skittles packets. Then I wrapped each skittles bag in white crepe paper. Here’s the end result.

I think the kids will really like the Mummy treats. For those of you that were wondering where to get google eyes here in Jakarta, I got mine at one of the shops in the Mayestik Marketplace in South Jakarta.
I also made the classic kleenex lollipop ghosts. The kids had fun helping me make the ghosts. My daughter helped me draw faces on the ghosts. It’s an oldie, but a classic. Kids love these lollipop ghosts!

Do you have any fun and easy Halloween treat ideas you’d like to share? I’d love to hear about it!

I think the kids will really like the Mummy treats. For those of you that were wondering where to get google eyes here in Jakarta, I got mine at one of the shops in the Mayestik Marketplace in South Jakarta.
I also made the classic kleenex lollipop ghosts. The kids had fun helping me make the ghosts. My daughter helped me draw faces on the ghosts. It’s an oldie, but a classic. Kids love these lollipop ghosts!

Do you have any fun and easy Halloween treat ideas you’d like to share? I’d love to hear about it!
Wednesday, October 26, 2011
Halloween Crafts from Recyclables
My daughter has been helping me make Halloween decorations. She loves to make things so it has been fun to do some fun crafts with her.
Craft #1
Jack-O-Lantern Luminary
I had an empty glass jam jar that I cleaned and dried. I asked my daughter what kind of face she wanted on her jar. She wanted triangle eyes, a square nose, and a triangle mouth. I cut the shapes out of masking tape and put in on the jar. She painted the jar orange. Then she peeled off the tape and painted the face parts yellow. I wanted her to leave them clear so that the candlelight would shine through better but she insisted on painting them in…can’t argue with a 4-year old. She could hardly wait for the paint to dry so we could put in a votive candle. Here’s the end result.


Craft #2
Empty Box Mummies
I saw a tutorial for some empty box mummies using an old white sheet and google eyes. The tutorial is here if you want to see the original. I thought they were adorable! I had different sizes of empty boxes. My daughter picked out 3 that she liked. We used toilet paper to wrap our boxes. I unrolled a long piece. Then I folded it in half so it would be thicker and not as wide. My daughter taped one end and we started wrapping the boxes. We wrapped along the top and sides of the box first and then around the middle. Periodically I put in a couple of pieces of tape to hold the toilet paper in place. I cut some round white circles from scrap paper. Then I cut out some smaller black circles and glued them to the white circles. Then my daughter glued the eyes to the wrapped boxes. I thought they turned out really well. The smallest box is actually wrapped with a folded paper towel. We tried that first, but it didn’t work all that well.

Craft #3
Toilet paper jack-o-lanterns
I have seen fabric-wrapped toilet paper pumpkins before. I also came across this tutorial explaining how to make tissue-paper wrapped pumpkins. Instead of rolling the paper around the toilet paper rolls and tucking in both ends, I thought the pumpkins looked a little better if I just placed the toilet paper roll in the middle of the sheet of tissue paper and then tucked in the paper through the top. I cut a small strip of green crepe paper for the leaves. I had my daughter crumple a piece of brown origami paper for the stem which we also stuffed through the top. Instead of drawing on jack-o-lantern faces with a marker, I cut some face parts out of black paper. My daughter told me what kind of faces she wanted for the pumpkins. Here my daughter is posing with the box mummies and the jack-o-lanterns.

Craft #4
Pringles Can Frankenstein
I had an empty pringles can that I thought we could decorate as a Frankenstein. We wrapped green paper around the tube for the face. We cut a strip of black paper and my daughter fringed it for the hair. Then we wrapped most of the bottom part of the can with black paper and put in a strip of white paper with a little scoop cut out at the top to make his clothes. I drew in the face with a black marker. I also attached some brown rolled paper to the sides of the neck. Here’s the end result.

I had so much fun making these crafts with my 4-year old. It didn’t really cost us much to make these decorations. The only thing I purchased that I didn’t already have was the orange tissue paper. There are so many creative ideas out there for recycled crafts so get your creative juices flowing and go make something! Happy Crafting and Happy Halloween!
Craft #1
Jack-O-Lantern Luminary
I had an empty glass jam jar that I cleaned and dried. I asked my daughter what kind of face she wanted on her jar. She wanted triangle eyes, a square nose, and a triangle mouth. I cut the shapes out of masking tape and put in on the jar. She painted the jar orange. Then she peeled off the tape and painted the face parts yellow. I wanted her to leave them clear so that the candlelight would shine through better but she insisted on painting them in…can’t argue with a 4-year old. She could hardly wait for the paint to dry so we could put in a votive candle. Here’s the end result.


Craft #2
Empty Box Mummies
I saw a tutorial for some empty box mummies using an old white sheet and google eyes. The tutorial is here if you want to see the original. I thought they were adorable! I had different sizes of empty boxes. My daughter picked out 3 that she liked. We used toilet paper to wrap our boxes. I unrolled a long piece. Then I folded it in half so it would be thicker and not as wide. My daughter taped one end and we started wrapping the boxes. We wrapped along the top and sides of the box first and then around the middle. Periodically I put in a couple of pieces of tape to hold the toilet paper in place. I cut some round white circles from scrap paper. Then I cut out some smaller black circles and glued them to the white circles. Then my daughter glued the eyes to the wrapped boxes. I thought they turned out really well. The smallest box is actually wrapped with a folded paper towel. We tried that first, but it didn’t work all that well.

Craft #3
Toilet paper jack-o-lanterns
I have seen fabric-wrapped toilet paper pumpkins before. I also came across this tutorial explaining how to make tissue-paper wrapped pumpkins. Instead of rolling the paper around the toilet paper rolls and tucking in both ends, I thought the pumpkins looked a little better if I just placed the toilet paper roll in the middle of the sheet of tissue paper and then tucked in the paper through the top. I cut a small strip of green crepe paper for the leaves. I had my daughter crumple a piece of brown origami paper for the stem which we also stuffed through the top. Instead of drawing on jack-o-lantern faces with a marker, I cut some face parts out of black paper. My daughter told me what kind of faces she wanted for the pumpkins. Here my daughter is posing with the box mummies and the jack-o-lanterns.

Craft #4
Pringles Can Frankenstein
I had an empty pringles can that I thought we could decorate as a Frankenstein. We wrapped green paper around the tube for the face. We cut a strip of black paper and my daughter fringed it for the hair. Then we wrapped most of the bottom part of the can with black paper and put in a strip of white paper with a little scoop cut out at the top to make his clothes. I drew in the face with a black marker. I also attached some brown rolled paper to the sides of the neck. Here’s the end result.

I had so much fun making these crafts with my 4-year old. It didn’t really cost us much to make these decorations. The only thing I purchased that I didn’t already have was the orange tissue paper. There are so many creative ideas out there for recycled crafts so get your creative juices flowing and go make something! Happy Crafting and Happy Halloween!
Subscribe to:
Posts (Atom)