My kids are not big tofu fans. I grew up eating rice, noodles, seaweed, and of course tofu so I love the stuff. The only tofu dish I have been able to get my kids to eat is called MaPo Tofu. They generally don't like the kind that you might order at a Chinese restaurant. This is the way I have to make it for them to eat it. Personally, I really like this version of MaPo Tofu too. It's really a very simple dish. This recipe is basically the one on the bottle of the chili bean paste so it's not my personal recipe. I would post the actual recipe on the bottle, but my chili bean paste I bought here in Jakarta has the recipe written in Indonesian. The recipe is how I remembered making it when we lived in the U.S.
Ingredients:
2-3 cloves of garlic, minced
1-2 stalks of green onion, diced
3 Tbs oil
1/2 lb. of ground pork or ground beef (we prefer pork although pork is difficult to come by in Indonesia since many grocery stores do not carry it)
2 Tbs. Chili Bean Sauce (available at most grocery stores that have some kind of Asian food isle...in Texas I usually got it at H.E.B.)
2 Tbs. water
1 package of tofu cut into small cubes (my kids like extra firm...you can use soft, firm, or extra firm)
Saute garlic and green onion in oil to flavor the oil. Add ground beef and stir fry until pork is cooked. Add cubed tofu. Add chili bean sauce and water. Make sure tofu and pork are mixed and evenly coated with sauce. Simmer for a few minutes. Serve over rice. I made it for dinner tonight, but I forgot to take a picture. I'll try and add a picture the next time I make it. Oh, in case the chili bean sauce didn't give it away, I forgot to add that the dish is mildly spicy. Enjoy!
Sunday, June 5, 2011

Friday, June 3, 2011
Roasted Chicken with brown rice stuffing

My friend has a neat food blog at http://whydiscovertheworld.blogspot.com/. She posts different recipes from different parts of the world. She also posts recipes that she has tried that are just good. Today for lunch I made the recipe she posted for the roasted chicken with brown rice stuffing (http://whydiscovertheworld.blogspot.com/2011/05/roasted-chicken-with-brown-rice.html). My 3 kids ages, 2, 4, and 6 liked the dish as well as my husband.
Ingredients:
whole chicken
1 cup cooked brown rice
1 clove garlic diced
3 green onions (chopped)
2 tbs butter
fresh basil, parsley, rosemary (I used dried and still turned out well)
salt/pepper
Mix all the ingredients together with the rice. Stuff inside the chicken. Season the chicken with oil, salt, and thyme. Bake in the oven at 350F for 1.5 hours. Basting the chicken every so often is a good idea so that it doesn't dry out.
I made a few other changes to the recipe. I omitted the chopped celery since my kids are not big on celery. I stuffed the chicken with 1 cup of brown rice, but I made extra rice stuffing and placed the chicken on top of the rice. Then, every half hour, I basted the chicken with some chicken broth since the rice in the bottom of the dish would absorb any juices from the chicken. I probably should have stirred the rice because it got a little crunchy but just on the edges. It took about 1.5 hours to roast the chicken. The rice had great flavor as did the chicken. I rubbed the chicken with some oil, salt, pepper, rosemary, and thyme.
We will definitely be making this dish again.
Basic White Bread
I have never been able to successfully make bread using a machine or otherwise. Then I came across this recipe, and the bread turns out really well every single time. I don't own a bread machine or a kitchen aid mixer. The recipe can certainly be made using those kitchen accessories, but they are not a requirement. I got this recipe from the simple dollar website. He has pictures and step by step instructions on how to bake bread.
Here is the recipe:
1/4 cup milk
5 tsp. sugar
1 tsp. salt
5 tsp. butter
1 pkg. active dry yeast
2.5 to 2.5 cups all purpose flour

Dissolve yeast in 1 cup warm water. Add milk, sugar, salt, and melted butter. Mix in 2 cups flour. Add flour 1/4 cup at a time until soft dough forms. Knead for 10 minutes. Cover and let rise 1 hr. Punch down. Roll out into rectangle the width of the pan. Roll up and tuck ends under. Place in greased bread pan. Cover and let rise another hour. Bake at 400F for 30 minutes. Makes 1 loaf. I've heard that it does not work to double the recipe for bread if you want to make 2 loaves so I just made two separate batches. The final product has a slightly crunchy crust and a really nice, soft, moist middle. I always have to make 2 loaves because 1 usually gets consumed right away :)
Here is the recipe:
1/4 cup milk
5 tsp. sugar
1 tsp. salt
5 tsp. butter
1 pkg. active dry yeast
2.5 to 2.5 cups all purpose flour

Dissolve yeast in 1 cup warm water. Add milk, sugar, salt, and melted butter. Mix in 2 cups flour. Add flour 1/4 cup at a time until soft dough forms. Knead for 10 minutes. Cover and let rise 1 hr. Punch down. Roll out into rectangle the width of the pan. Roll up and tuck ends under. Place in greased bread pan. Cover and let rise another hour. Bake at 400F for 30 minutes. Makes 1 loaf. I've heard that it does not work to double the recipe for bread if you want to make 2 loaves so I just made two separate batches. The final product has a slightly crunchy crust and a really nice, soft, moist middle. I always have to make 2 loaves because 1 usually gets consumed right away :)
Chewy Brownies
We really liked the Betty Crocker original supreme brownie mix. It is not readily available here in Indonesia. Once in awhile I'll see some cake or cookie mix that is imported from the U.S, but they are so expensive. A boxed cake/cookie mix will run around $4 to $5 US dollars. I wanted to know if there was a good from scratch brownie recipe that would be just as good. I looked around on the internet and tried a few different recipes. I found one that we like. So far, it's our family's favorite brownie recipe. We like our brownies to be fudgy, moist, and chewy. This one delivers. I don't know that it is quite as good as the Betty Crocker mix, but it is definitely close.
I've found that the baking cocoa in Indonesia seems a little darker and richer. The sugar here is very coarse so I could still see sugar crystals in the brownies after they were baked. The brownies still tasted good but they definitely looked and tasted just a little different from brownies baked in the US. It's amazing what different brands and the coarseness of the powder and sugar will do to the final product. My kids still loved the brownies and we quickly devoured an entire 8x8 pan.
Here is the recipe:
1/2 cup vegetable oil (I find that oil instead of butter seems to make for nice, moist, brownies)
1 cup sugar
1 tsp. vanilla
2 eggs
1/2 cup all purpose flour
1/2 cup cocoa powder
1/4 tsp. baking powder
1/4 tsp. salt
I mix the sugar and oil together first. Then I add the eggs and vanilla and mix. Finally I just dump everything else in and mix by hand using a whisk. It is okay that the batter is lumpy. I grease an 8x8 in. pan, pour in the mix, and put it in the oven at 350F for 20 minutes. I wish I could remember which website I got the recipe from. I didn't write down the name of the site. If this is your recipe, thanks so much! We love it!

I've found that the baking cocoa in Indonesia seems a little darker and richer. The sugar here is very coarse so I could still see sugar crystals in the brownies after they were baked. The brownies still tasted good but they definitely looked and tasted just a little different from brownies baked in the US. It's amazing what different brands and the coarseness of the powder and sugar will do to the final product. My kids still loved the brownies and we quickly devoured an entire 8x8 pan.
Here is the recipe:
1/2 cup vegetable oil (I find that oil instead of butter seems to make for nice, moist, brownies)
1 cup sugar
1 tsp. vanilla
2 eggs
1/2 cup all purpose flour
1/2 cup cocoa powder
1/4 tsp. baking powder
1/4 tsp. salt
I mix the sugar and oil together first. Then I add the eggs and vanilla and mix. Finally I just dump everything else in and mix by hand using a whisk. It is okay that the batter is lumpy. I grease an 8x8 in. pan, pour in the mix, and put it in the oven at 350F for 20 minutes. I wish I could remember which website I got the recipe from. I didn't write down the name of the site. If this is your recipe, thanks so much! We love it!

Thursday, June 2, 2011
One Box-Two Projects
The kids had a Step 2 play kitchen and a Loving Family doll house that they really loved playing with when we lived in Texas. Unfortunately, those were 2 items that we could not bring because of their size. I even tried disassembling the doll house, but it would have taken 2 large suitcases just to accomodate the doll house. We did not have the luxury of allocating 2 suitcases for one item so the dollhouse had to stay.
I told the kids that if we could find a large box, we could make a play kitchen and a doll house. While we were visiting at a friend's house, I asked if she had a large box that we could have. She happened to have one that she was nice enough to give us.
We were able to make both the doll house and the play kitchen from just the one box. I was pleasantly surprised myself because I wasn't sure where I would be able to get another large box. My kids had a fun time making both the kitchen and the doll house.

I cut out the inner flaps from both ends of the box. Then my oldest daughter taped the box shut. I cut the box basically down the middle although the kitchen might be marginally wider than the doll house. I cut out the faucet and made the knobs from one of the cardboard flaps. My daughter taped the faucet and knobs with red duct tape that she had picked out herself. I guess the red is a nice contrast with the brown :)
I made the oven door by cutting the front of the box on 3 sides. The oven handle was made out of braided duct tape. I cut two holes in the oven door, shoved one end of the braided handle on each side and taped them down.
The back of the oven is open which doesn't matter since it is against the wall. I taped in one of the flaps in the middle of the box to make a shelf. Now when the oven door is opened, there is a place to put cookware. The kids enjoy putting all sorts of things in the oven.
The burners are made from old cds taped onto the top. The sink is made from a small oven pan. I could have used a small bowl just as well.
Anyway, it didn't take that long to put the kitchen together. The kids love to cook on their new play kitchen. My daughter said it didn't look "that beautiful" but she still likes playing with it.

I actually did need a couple of extra smaller boxes for the doll house, but the main structure of the house is made from the original large box. This time the closed side is against the wall. The roof of the house is made from the inner flaps of the box. The verticle middle partition is also one of the inner flaps. The horizontal middle partitions are made from a ramen noodles box.
The kids picked what they wanted each room to be. The furniture is made out of cardboard fragments from the noodle box and from cereal boxes.
Here is the bathroom. The kids told me what they wanted in the bathroom...tub, double sinks, toilet. The kids did all the coloring.


The kids really like the kitchen and doll house. I had so much fun making it with them. My son said that we were "reusing" the boxes. He said he learned about that at school too. I'm glad that these projects helped reinforce that concept. I told the kids that we could always make different furniture or change out the people.
The girls were playing with the empty box before we even made the kitchen and doll house. Boxes are just so much fun. The kids love their new toys. Who would have thought that you could have so much fun with one big box!
I told the kids that if we could find a large box, we could make a play kitchen and a doll house. While we were visiting at a friend's house, I asked if she had a large box that we could have. She happened to have one that she was nice enough to give us.
We were able to make both the doll house and the play kitchen from just the one box. I was pleasantly surprised myself because I wasn't sure where I would be able to get another large box. My kids had a fun time making both the kitchen and the doll house.

I cut out the inner flaps from both ends of the box. Then my oldest daughter taped the box shut. I cut the box basically down the middle although the kitchen might be marginally wider than the doll house. I cut out the faucet and made the knobs from one of the cardboard flaps. My daughter taped the faucet and knobs with red duct tape that she had picked out herself. I guess the red is a nice contrast with the brown :)
I made the oven door by cutting the front of the box on 3 sides. The oven handle was made out of braided duct tape. I cut two holes in the oven door, shoved one end of the braided handle on each side and taped them down.
The back of the oven is open which doesn't matter since it is against the wall. I taped in one of the flaps in the middle of the box to make a shelf. Now when the oven door is opened, there is a place to put cookware. The kids enjoy putting all sorts of things in the oven.
The burners are made from old cds taped onto the top. The sink is made from a small oven pan. I could have used a small bowl just as well.
Anyway, it didn't take that long to put the kitchen together. The kids love to cook on their new play kitchen. My daughter said it didn't look "that beautiful" but she still likes playing with it.

I actually did need a couple of extra smaller boxes for the doll house, but the main structure of the house is made from the original large box. This time the closed side is against the wall. The roof of the house is made from the inner flaps of the box. The verticle middle partition is also one of the inner flaps. The horizontal middle partitions are made from a ramen noodles box.
The kids picked what they wanted each room to be. The furniture is made out of cardboard fragments from the noodle box and from cereal boxes.
Here is the bathroom. The kids told me what they wanted in the bathroom...tub, double sinks, toilet. The kids did all the coloring.

Here is the kitchen. My daughter made the shelves on the wall and decorated the table.

Here is the girls' room. My older daughter tried writing her name. She wanted a picture on the wall and put up decorations. She drew pillows on the beds.

Here is another bedroom...my son claimed this one. He decorated the walls. He drew bedding on one bed and made a pillow from cardboard for the other bed.

Here is an end table in one of the bedrooms. My daughter wanted a rug in her room so I helped her draw some flowers. She did all the coloring.

The kids wanted the people to represent our family. I cut out the shapes and they decorated the people. I asked my daughter why I had blond hair (my hair is black)...she had no response :) I made the dog and cat. The kids love animals. Sadly we had to give our dog away before the big move. We never have had a cat because I am very allergic to those furry critters.

The kids really like the kitchen and doll house. I had so much fun making it with them. My son said that we were "reusing" the boxes. He said he learned about that at school too. I'm glad that these projects helped reinforce that concept. I told the kids that we could always make different furniture or change out the people.
The girls were playing with the empty box before we even made the kitchen and doll house. Boxes are just so much fun. The kids love their new toys. Who would have thought that you could have so much fun with one big box!
Living with Less
You know, moving to a new country with just a few suitcases is not a bad idea. At first I was quite upset that we only had the option of storing our things or shipping them. Having been here in Indonesia for 3 months now, our family has found that we don't really miss the things we left behind. The kids are actually quite happy with the few toys we brought. We just brought the clothes that we wore most often, and everyone seems quite happy with that as well.
Being here in Jakarta has made me or actuallly all of us realize that we can live with much less and still be quite happy. We actually didn't have much to begin with. When the packers came to assess our things for storage, we found that we didn't even come close to filling up the 40ft. container we were allotted. The lady that assessed our things said that our 2700 sq. ft. house would have to be bulging at the seams to fill up the container. If we were shipping our things, we were allotted up to 40,000 lbs. of stuff. They estimated that we only had about 10,000 to 12,000 lbs. worth of stuff and that was before we purged and got rid of couches, tables, dressers, etc. We estimated that we definitely had much less than 10,000 lbs. by the time everything went into storage.
We arrived in Indonesia with 10 large suitcases weighing 40 lbs each. That means we brought only 400 lbs. worth of stuff. Deciding what to bring was a bit of an ordeal at first, but we are happy with the end results.
For toys, we ended up bringing things like dress-up clothes, play food, play cookware, tea set, dolls plus clothes and accessories, legos, army men, a few little people sets, puzzles, and some card games. These toys provide lots of room for imagination and creativity. The kids have had endless fun with the toys even though what we brought was a fraction of what we had back in Texas.
We brought the kids' bedding because we wanted them to have something familiar. They also brought a few of their special stuffed animals. My youngest brought her 3 favorite security blankets.
We had a ridiculous number of books, but we narrowed it down to one small suitcase of favorites. The kids have been happy with their books. We are also able to check out books from the International School's library. The school has also sponsored book swaps and discount book sales so we have had additional opportunities to have some variety in our reading choices.
We brought a few other things like tylenol and vitamins. We also brought some snacks for the kids to make their transition a little easier til we figured out where people shopped for groceries and what was available. We also brought the kids' favorite cups and plates. We tried to allot most of the suitcases to bring things the kids would want and that would make their transition to living in Indonesia easier.
A lady came over to the apartment the other day and asked why we didn't have any things. We told her that we just came with a few suitcases. People always seem surprised that we would bring our entire family to a new country without shipping our things from home. Honestly, I would have thought we were crazy too, but now DH and I have discussed how we really like the simplicity of living with less.
We are actually able to spend more family time here. Instead of watching TV or watching movies, we go play tennis or swimming with the kids. We take the kids out to ride their bikes or walk around the apartment complex. The kids have play dates with other kids that live in the apartment complex. Although we have less material things, we feel like the quality of our lives has actually increased.
My son had a project at school where he had to make a collage depicting needs vs. wants. I was pleased to see that he had put home, bed, shoes, and food under needs. He put junk food, Wii games, and toys under wants. I guess even at age 6 he does know the difference between needs and wants.
I hope that if nothing else, the kids learn that we can be happy by spending quality time together and by making do. Most importantly, I hope that they will learn that happiness is an attitude and choice and that it can come from being thankful for the things that we have. It definitely does not come from having more things.
Being here in Jakarta has made me or actuallly all of us realize that we can live with much less and still be quite happy. We actually didn't have much to begin with. When the packers came to assess our things for storage, we found that we didn't even come close to filling up the 40ft. container we were allotted. The lady that assessed our things said that our 2700 sq. ft. house would have to be bulging at the seams to fill up the container. If we were shipping our things, we were allotted up to 40,000 lbs. of stuff. They estimated that we only had about 10,000 to 12,000 lbs. worth of stuff and that was before we purged and got rid of couches, tables, dressers, etc. We estimated that we definitely had much less than 10,000 lbs. by the time everything went into storage.
We arrived in Indonesia with 10 large suitcases weighing 40 lbs each. That means we brought only 400 lbs. worth of stuff. Deciding what to bring was a bit of an ordeal at first, but we are happy with the end results.
For toys, we ended up bringing things like dress-up clothes, play food, play cookware, tea set, dolls plus clothes and accessories, legos, army men, a few little people sets, puzzles, and some card games. These toys provide lots of room for imagination and creativity. The kids have had endless fun with the toys even though what we brought was a fraction of what we had back in Texas.
We brought the kids' bedding because we wanted them to have something familiar. They also brought a few of their special stuffed animals. My youngest brought her 3 favorite security blankets.
We had a ridiculous number of books, but we narrowed it down to one small suitcase of favorites. The kids have been happy with their books. We are also able to check out books from the International School's library. The school has also sponsored book swaps and discount book sales so we have had additional opportunities to have some variety in our reading choices.
We brought a few other things like tylenol and vitamins. We also brought some snacks for the kids to make their transition a little easier til we figured out where people shopped for groceries and what was available. We also brought the kids' favorite cups and plates. We tried to allot most of the suitcases to bring things the kids would want and that would make their transition to living in Indonesia easier.
A lady came over to the apartment the other day and asked why we didn't have any things. We told her that we just came with a few suitcases. People always seem surprised that we would bring our entire family to a new country without shipping our things from home. Honestly, I would have thought we were crazy too, but now DH and I have discussed how we really like the simplicity of living with less.
We are actually able to spend more family time here. Instead of watching TV or watching movies, we go play tennis or swimming with the kids. We take the kids out to ride their bikes or walk around the apartment complex. The kids have play dates with other kids that live in the apartment complex. Although we have less material things, we feel like the quality of our lives has actually increased.
My son had a project at school where he had to make a collage depicting needs vs. wants. I was pleased to see that he had put home, bed, shoes, and food under needs. He put junk food, Wii games, and toys under wants. I guess even at age 6 he does know the difference between needs and wants.
I hope that if nothing else, the kids learn that we can be happy by spending quality time together and by making do. Most importantly, I hope that they will learn that happiness is an attitude and choice and that it can come from being thankful for the things that we have. It definitely does not come from having more things.
Indonesian Satay
My son asked to have satay for dinner tonight. He helped me make both chicken and beef satay. We used the same marinade for both. I got the recipe from a site called http://rasamalaysia.com/. They have really great Asian recipes...Taiwanese, Indonesian, Malaysian, etc. I am going to try more of their recipes in the future.
Marinade for the satay:
good sprinkle of garlic salt (I used quite a bit)
some ground paprika
some white pepper
2 tsp. coriander powder
2 tsp. nutmeg powder
1 tsp. cumin
1 tsp. olive oil
2 cloves shallots thinly sliced
dash of soy sauce
lots of kecap manis (Indonesian sweet soy sauce)
I did not make the peanut sauce that is normally served with satay. Neither my son nor my husband are big fans of peanut sauce. If you want to make the peanut sauce, the recipe is included at the Rasa Malaysia website.
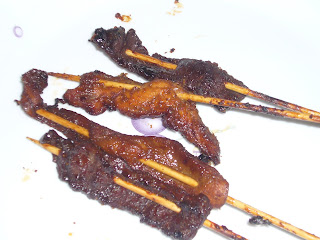
I used chicken breast and flank steak for my cuts of meat. I sliced the meat lengthwise in fairly thin strips. The meat sat in the marinade for about an hour. I put them on wooden skewers (skewers must first be soaked in water so that they do not burn on the grill) and my husband grilled them on our small grill.
The satay is generally served with rice. Everyone really liked how the beef satay turned out. Even though it was the same marinade, the beef satay was just delicious! The chicken satay was good too...we just liked the beef better.
Marinade for the satay:
good sprinkle of garlic salt (I used quite a bit)
some ground paprika
some white pepper
2 tsp. coriander powder
2 tsp. nutmeg powder
1 tsp. cumin
1 tsp. olive oil
2 cloves shallots thinly sliced
dash of soy sauce
lots of kecap manis (Indonesian sweet soy sauce)
I did not make the peanut sauce that is normally served with satay. Neither my son nor my husband are big fans of peanut sauce. If you want to make the peanut sauce, the recipe is included at the Rasa Malaysia website.
I used chicken breast and flank steak for my cuts of meat. I sliced the meat lengthwise in fairly thin strips. The meat sat in the marinade for about an hour. I put them on wooden skewers (skewers must first be soaked in water so that they do not burn on the grill) and my husband grilled them on our small grill.
The satay is generally served with rice. Everyone really liked how the beef satay turned out. Even though it was the same marinade, the beef satay was just delicious! The chicken satay was good too...we just liked the beef better.

Subscribe to:
Posts (Atom)